Bash script to update Cloudflare DNS A records with a cron job
This article describes how to use the script found in this GitHub Repository.
The purpose of this script is to update our DNS records when our dynamic IP address changes. This will be set to run at a specific interval via a “cronjob”.
This script will check for the current external IP, check that it received an IP with the correct format (rather than just any value or error), compare it with the stored previous IP, and if they do not match, then update the Cloudflare DNS records for the configured “Zone ID”
Create a new file in a directory on your server
We downloaded the new file to the path “/home/filebrowser/cloudflare/”, to do that using SSH you need to browse to your directory of choice (i.e. “cd /home/filebrowser/cloudflare/“), and run the command below;
wget https://raw.githubusercontent.com/NChaves/Cloudflare_DNS_API_bash/main/template.shYou can also download it to your desktop, then upload it to your server using Filebrowser, if you have it installed on our server.
Once you have the file in place, you will need to edit a couple of things for it to work for you.
Editing different sections of the script.
## Cloudflare authentication details
On the below section, you need to update the script with your Cloudflare account details. This includes email address, API token and the Zone ID that you want to keep updated.
## Keep these private
cloudflare_auth_email=Your_Email
cloudflare_auth_key="Your_API_Token"
zoneid="Your_Zone_ID"
Zone ID can be found in the overview page of your selected zone, in our case the zone “couldtechtips.com”. Once in the zone overview, you can find the Zone ID at the bottom-right of the page.
Just below the Zone ID, and Account ID, you can then also create a new API Token.
We created an API token with permissions as below;
All zones - DNS:Read, DNS:Edit## Cloudflare Proxied DNS Records as Array
This section is an array of domain name entries, here you list the “A” records to be updated by the script.
dnsrecords_proxied=(
"domain.com"
"www.domain.com"
"sub1.domain.com"
"sub2.domain.com"
"sub3.domain.com"
"sub3.domain.com"
)
The above array is named “*_proxied”, this refers to the A records that you want the “Proxy status“ to be set as “Proxied”.
There are cases where you do not want a record to be proxied, add those records to the next array.
## Cloudflare Non-Proxied DNS Records as Array
This next array, “*_not_proxied” you use for DNS records you do not want to proxy through Cloudflare. In the example below, there are a couple of records that are specifically for use with a VPN server.
dnsrecords_not_proxied=(
"vpn01.domain.com"
"vpn02.domain.com"
)
Leave the array empty if you do not have any records you want to set as “DNS only”.
## Files to log to (replace “path/to/” with script path)
Next, you need to replace the “path/to/” with the path to the directory you chose to put your script in. For this example, we would change “path/to/log.log” to “/home/filebrowser/cloudflare/log.log”.
log=path/to/log.log
log_ip=path/to/previous_ip
The above will allow the script to store the current IP and logs of each run.
You can also rename the files used, making them unique to the script, would suggest changing “log.log” to “template_log.log” and “previous_ip” to “template_previous_ip”. Recommended if running multiple copies of the script for different Cloudflare zones.
The script logs the last 1000 entries, you can increase or decrease the number of lines saved by changing the lines below;
echo "$(tail -n 1000 $log)" > $logYou will find them in lines 38 and 87 of the script.
How to configure a Cronjob to run the script.
To configure a Cronjob to run your script, you need to connect to your server via SSH, once connected run the command “sudo -i”.
Now run “crontab -e” to start editing the crontab, then add your cronjob to the bottom of the file as below;
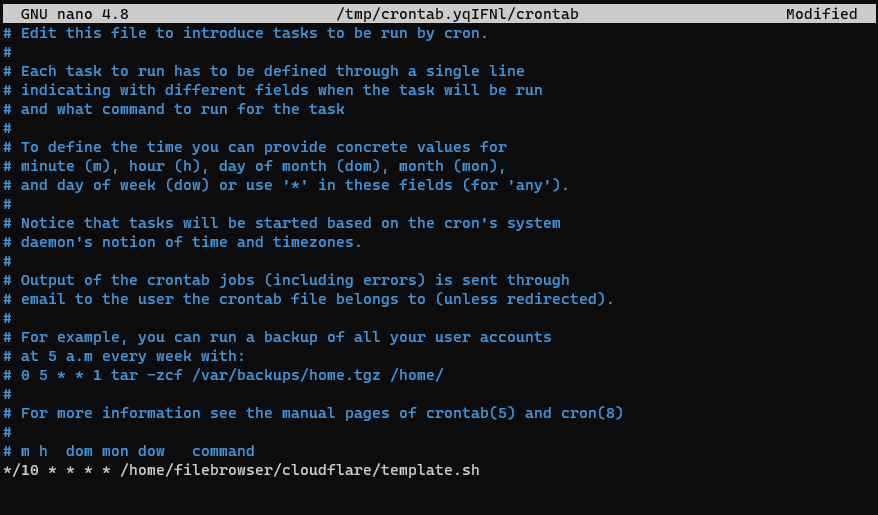
The above would run the script every 10 minutes, save the file (CTRL + O) and close it (CTRL + X).
You can configure your own cronjob however you choose to. The cron expression generator by Cronhub is a great tool for those unfamiliar with cron expressions.